
|
|
Comments: This is the fourth and final use of Obverse 2 and the only use of Reverse E in 1870. Reverse E was subsequently used to strike all 1873-CC examples. |
Obverse 2 The following photo shows the attribution lines for Obverse 2. This die is easy to identify since it’s the only obverse with the base of the 1 lining up left of centered. 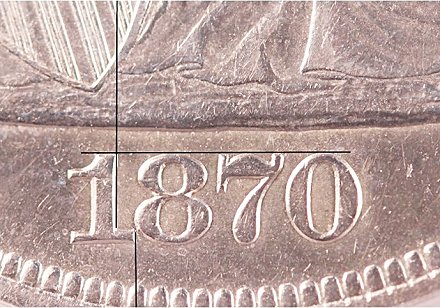 1870-CC Obverse 2 attribution grid
|
The following photo shows the attribution lines for 1870-CC Reverse E. Reverse E is the first of the two medium CC reverses. These can be difficult to differentiate. The second C is farther to the right on Reverse E, and thus closer to the stem. The Reverse E mintmarks are barely wider than Reverse F. The line from the feather tip to the upper right edge of the E in ONE passes through the upper serif of the first C for Reverse E, while on Reverse F it just grazes the right side of the serif.  1870-CC Reverse E attribution lines
Top-30 varieties. We estimate its rarity as R5+. Our reference example of this rotation has a state b reverse. We haven’t determined which came first, the rotation or the clashing. It’s possible that the dies clashed, were removed for polishing, and began rotating when returned to the coining press. |
| Photo credits:
Obverse 2: 1870-CC PCGS AU55, from the Osburn-Cushing reference collection. Reverse E: 1870-CC PCGS AU55 CAC, from the Osburn-Cushing reference collection. |