
|
|
Comments: This is the first of four uses of Obverse 2 and the second and final use of Reverse A in 1870. Reverse A was subsequently used to strike all 1872-CC examples. |
Obverse 2 The following photo shows the attribution lines for Obverse 2. This die is easy to identify since it’s the only obverse with the base of the 1 lining up left of centered. 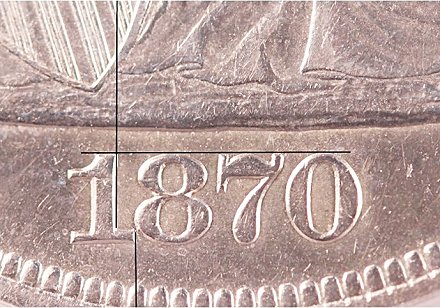 1870-CC Obverse 2 attribution grid
|
The following photo shows the attribution lines for 1870-CC Reverse A. 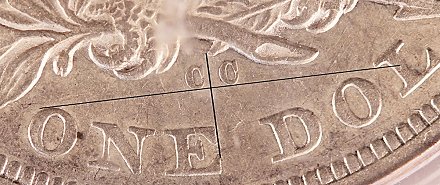 1870-CC Reverse A attribution lines This reverse is classified as one of two wide CC reverses. The other is Reverse C. The wide CC’s can be identified by noting that a line from the tip of the arrow feather to the upper right edge of the E in ONE passes completely right of the first C. The two wide CC reverses are very similar. They can be distinguished by noting the line drawn under the mintmark. On Reverse A this line grazes the top of the O in ONE and barely touches the lower tip of the upper left serif of the L in DOL. On Reverse C this line passes through the right side of the curve of the O and the upper right serif of the L. Reverse C is rare and seldom seen. Reverse A was used to strike OC-1 and OC-2.
|
| Photo credits:
Obverse 2: 1870-CC PCGS AU55, from the Osburn-Cushing reference collection. Reverse A: 1870-CC PCGS AU53, from the Osburn-Cushing reference collection. |